A new runtime is available as part of the existing Apple runtime package. The new runtime is experimental and may be subject to breaking changes. The legacy runtime is still supported and will continue to be supported in the near future, but is now considered to be in maintenance mode. It is recommended to begin using the new API in new projects and provide feedback, and to investigate migrating existing projects to the new API when feasible.
Overview
This guide documents how to get started using the Apple runtime library. Rive runtime libraries are open-source. The source is available in its GitHub repository. This library contains an API for Apple apps to easily integrate their Rive assets for both UIKit/AppKit and SwiftUI. The runtime can be installed via Cocoapods or Swift Package Manager. The Apple runtime currently supports iOS 14.0+, visionOS 1.0+, tvOS 16.0+, macOS 13.1+, and Mac Catalyst 14.0+ The new Apple runtime is designed as a Swift-first API leveraging Swift Concurrency, with improved multi-threading support for Rive. The entry point is theRive type, which is a container for the configuration of a Rive view. This includes the file, artboard, state machine, fit, and background color.
Adding a Rive view is done by creating a RiveUIView with a Rive object, and then adding it to the view hierarchy. In SwiftUI, this is as easy as calling .view() on a RiveUIView object.
It is important to note that while multi-threading is supported, the calls from Rive objects must still be made on the main thread. This is enforced at compile time by marking functions and types as @MainActor.
Most APIs are marked as throws, with Error types available for the different Rive primitives.
Getting Started
Follow the steps below for a quick start on integrating Rive into your Apple app.1
Install the Runtime
With CocoaPods going into maintenance mode, we recommend using Swift Package Manager.To install via Xcode, you can follow Apple’s instructions for adding a package dependency to your app, with the Apple runtime’s GitHub URL: https://github.com/rive-app/rive-ios.Alternatively, you can add the dependency manually by adding the following to your Then add the dependency to your target:
Package.swift file:2
Import Rive
The new API types are behind the
RiveExperimental SPI, so the standard runtime import must be prefixed with @_spi(RiveExperimental).3
Create a Worker
A For more information on threading, see Threading.
Worker is what handles concurrency in the Rive runtime. This type handles starting a background thread for processing, in addition to handling global (out-of-band) assets.A Worker must be alive for the duration of Rive usage. A File creates a strong reference to a Worker, so a Worker will at least be alive for the duration of use of a File, unless a reference to a Worker is kept outside of a file.4
Load a File
Once you have created a You can opt-in to creating a worker inline if you are using Rive in its most basic form.
Worker, you can move onto creating a File. Each File object takes a source and a worker.The
File initializer is marked @MainActor.5
Add a View
Once you have created a The above example uses the default artboard and state machine for the file, binding the default view model instance to the state machine if available. This is the default behavior when initializing a
File, you can move onto creating a Rive object. This object defines the configuration of a view. The most basic implementation is created with just a file; Rive will handle loading the default artboard and state machine for rendering. Additionally, if the artboard contains a default view model instance, it will be bound to the state machine automatically.Once you have created a Rive object, you can initialize a RiveUIView. This view is used both in UIKit and SwiftUI. Bridging to SwiftUI is as easy as calling .view().There is a convenience initializer on RiveUIView that runs the closure to create a Rive object on the main actor, meeting concurrency requirements.Rive object without specifying an artboard or state machine.Alternatively, you can also specify which artboard and state machine to use. Documentation and examples for manually selecting which artboard to use is available in the Artboards documentation. Documentation and examples for manually selecting which state machine to use is available in the State Machines documentation.6
Data Binding
Data Binding is a feature that allows you to dynamically update your Rive graphics from code. This includes things such as strings, numbers, booleans, and more.By default, creating a Once data binding is set up, you can update and listen to data binding properties at runtime.
Rive object will automatically data bind to the default view model instance for its artboard. However, there are three options for data binding:7
Examples
For basic usage, see the Marty example in our Example app.For a more complete example, see the Quick Start example in our Example app, which demonstrates how to use data binding.
Threading
The new runtime supports multi-threading through the introduction of The
Worker objects.Worker object is responsible for creating and managing the background thread for the Rive instance.Each worker shares out-of-band assets, such as images, fonts, and audio. This means that each File initialized with the same worker will share the same out-of-band assets.One worker roughly equates to one background thread. If you are rendering multiple heavy Rive graphics, you can create one Worker per file to have each processed on its own background thread.The number of Worker objects is limited by system availability; specifically, a Worker is backed by a DispatchQueue, which handles the creation and reuse of threads.It is important to note that while multi-threading is supported, Rive object API calls must still be made on the main actor. This is enforced at compile time with functions and types marked as @MainActor.Logging
The new runtime does not yet include logging, but will be added in the near future.
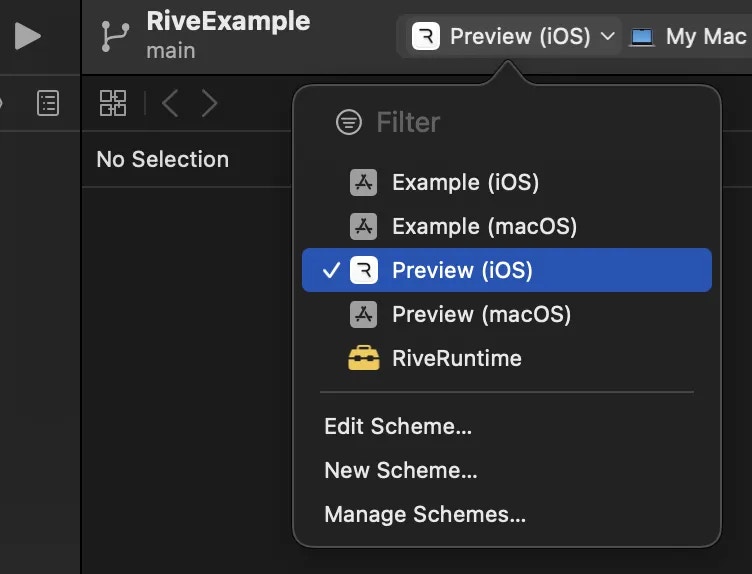
Example App
You can run our Apple example app from the Rive GitHub repository.Example-iOS app in Xcode and be sure to select the Preview (iOS) or Preview (macOS) scheme. The other schemes are for development purposes and require additional configuration, see CONTRIBUTING.MD.